Installation of the certificate.
Step 1.
The files with domain name: .crt and .ca-bundle are necessary to install the certificate on Apache platform
Step 2.
These files should be sent to the server the site is operating on in their respective catalogues.
We present standard settings:
Previously generated private key must be copied to the catalogue ssl.key. It is usually located in path /etc/ssl/. Only Apache should have access rights to the catalogue.
Files .crt and / ca-bundle are to be placed in catalogue ssl.crt, which is usually located in /etc/ssl/.
Step 3.
The next step is to edit the file with SSL configuration using a text editor.
Note: The location of this file may vary depending on the server configuration.
In case of Apache server those are the following localizations:
- Fedora/CentOS/RHEL: /etc/httpd/conf/httpd.conf
- Debian and Debian based: /etc/apache2/apache2.conf
Common names of files with SSL configuration:
- httpd-ssl.conf
- ssl.conf
files in configuration: /etc/apache2/sites-enabled/.
Step 4.
We proceed to the Virtual Host Configuration page. You should add (if they were not there before) entries listed below:
- SSLEngine on
- SSLCertificateKeyFile /etc/ssl/ssl.key/server.key
- SSLCertificateFile /etc/ssl/ssl.crt/YourDomain.crt
- SSLCertificateChainFile /etc/ssl/ssl.crt/YourDomain.ca-bundle (in case of Apache 1.x server one should additionally use SSLCertificateChainFile instead of SSLCACertificateFile)
Note: These localizations serve as examples. Supported server can have different locations, in such a situation there is the possibility to modify them.
Step 5.
The last thing is to save the configuration file and restart the server.
Installation certificate.
Combining certificates in one file.
Note: The following names are examples. Make sure which file you own is root certificate, intermediate certificate and the one issued for the domain.
Step 1.
If separate files are available (e.g. AddTrustExternalCARoot.crt):
Step 2.
If .crt i .ca-bundle files are available
Host configuration.
Step 1.
You should move the file ssl-bundle.crt to places where certificate files were saved, e.g. /etc/ssl/certs/
Then create or change (if it exists) the configuration of the page where you can find /etc/nginx/sites-available/ or /usr/local/nginx/sites-available/ as well
Step 2.
The next step is to make sure that configuration parameters listed below are set:
- enabled SSL
- ssl port ('listen') to 443
- path to the certificate ('ssl_certificate')
- path to the private key ('ssl_certificate_key')
- support for protocols (we recommend not sharing protocol 2.0)
- set the appropriate encryption
Installation of the certificate.
Step 1.
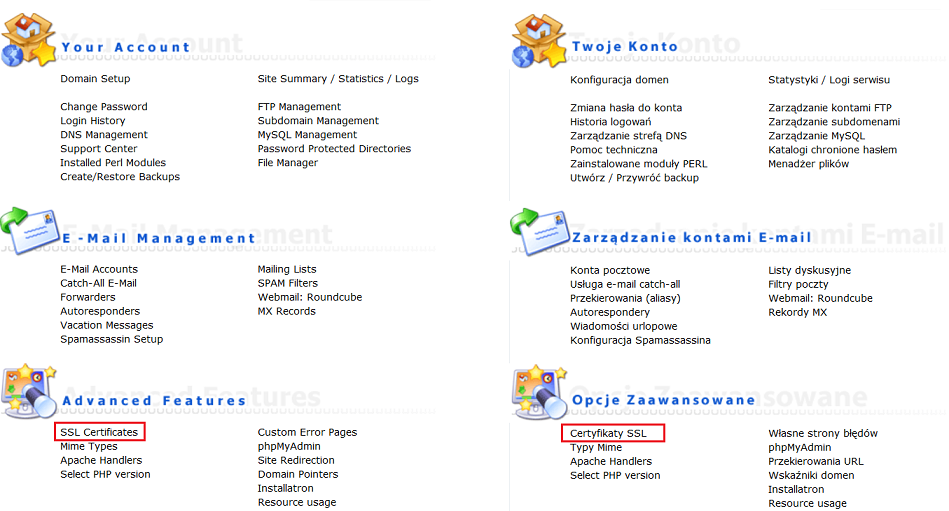
Go to Advanced Feature in the control panel, then choose SSL Certificates.
Step 2.
You will be transferred to Menu SSL
Step 3.
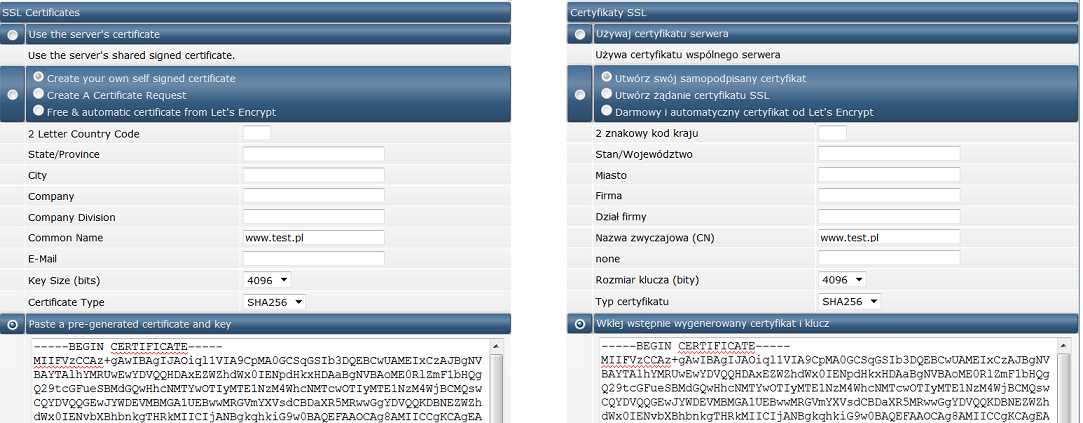
Now choose "Paste a pre-generated Certificate and key” visible at the bottom of the page and paste its key in PEM format
Installation of the certificate from Main Certification Office
Step 1.
You should return to SSL Menu
Step 2.
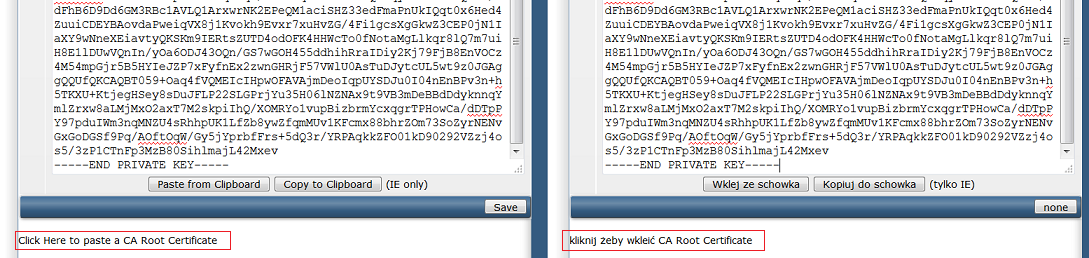
Now click on "Click here to paste a CA Root Certificate" situated at the bottom of the page
Step 3.
Copy the content of the certificate from the Central Certification Office and enter the copied value into the text field. Save using Save button..
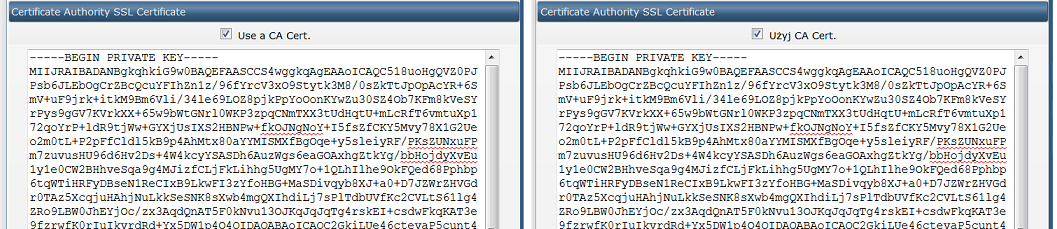
Note: you should remember to select the box Use a CA Cert.
Installation of certificate.
Step 1.
You must log into Management Panel at cPanel.
Step 2.
Use SSL/TLS Manager icon in Security section.
Step 3.
Generate, view, upload or delete SSL Certificates. Search page to find the heading Certificates and then click Generate, view, upload or delete SSL Certificates.
Step 4.
At this stage you should download Domain/End Entity Certificate
Step 5.
After receiving the message on installing the certificate, click on link Go back.
Step 6.
Go to the bottom of the page and click on SSL Manager.
Step 7.
Now you should find the heading Activate SSL on Your Web Site (HTTPS) and select option Set up a SSL Certificate to work with your site.
Step 8.
Then select the domain (page address) where you want to install the certificate. The system will try to load previously uploaded certificate with the key itself.
At this stage you can also load the certificate and key yourself.
Step 9.
Paste the file .ca-bundle (e.g. your_domain_pl.ca-bundle) to field CA Bundle
Step 10.
After you paste the content of the file, you have to confirm and click Install Certificate. After this action, the certificate is ready and you can complete the installation
Installation of certificate.
Step 1.
Log on to the server’s Management Panel in order to install the certificate.
Step 2.
In case of server Plesk 7, select Domains from menu. If you are using Plesk 8, click Home button and scroll to the bottom of the page.
Step 3.
Then click the name of the domain on which you want to install SSL certificate.
Step 4.
Select Certificates icon located in Services.
Step 5.
Installation of Certificate:
- Loading the certificate as crt file.
Use Browse button to find the certificate on your disc. It usually takes the form of your_domain.crt. After selecting the file, confirm by clicking Send File. Installation is completed.
- Loading the root certificate (CA)
Use Browse button to find file of the certificate on the disc. It usually takes the form of your_domain.ca-bundle. After selecting the file, confirm by clicking Send File. Installation is completed.
- Copying and pasting the content of the certificate
You should open file your_domain.crt in notepad or similar software as well as root certificate (CA), for example your_domain.ca-bundle.
Now copy the content of the file your_domain.crt and place the contents of this file in the Certificate box. Then do the same thing for the file twoja_domena.ca-bundle and place the content of this file in CA Certificate box.
Once these two steps are done, click Send Text. Installation is completed.
Step 6.
At this stage the certificate is added to the certificates at Plesk panel.
Launching the encryption of the page.
Step 1.
Go to the place where you installed the certificate.
Step 2.
Then click on Up Level located on the right side of Management Panel.
Step 3.
Find Setup icon and click on it.
Step 4.
Select the installed the certificate using the drop-down list.
Step 5.
Check the status of your IP and certificate.
Note: If there is a description Shared (sharing) next to your IP address, you will not be able to start encrypting your page. Shared Hosting does not permit setting one’s own SSL certificate. In this situation you must have your own private IP address. To learn more about resolving this issue, please contact our team of administrators.
Restarting WWW server.
Step 1.
Click on Server in left menu in Management Panel.
Step 2.
Find Service management icon and use it.
Step 3.
Click on Stop icon and then on Start icon for Web Server. Note here: do not use the usual options of restarting the server. After completing the option Stop and Start installation of the page encryption will be completed.
Installation of certificates.
Note: Before installing, make sure that the appropriate certificates required for installation are already on the server. If not, they should be sent prior to installation.
Step 1.
From Start menu, select Run and then mmc, confirm by pressing the enter key or OK button.
Step 2.
Click File in the console window and in menu select Add / Remove Snap in.
Step 3.
In the next window click on Add
Step 4.
Now select the previously saved certificates in the Add Standalone Snap-in window and confirm with Add button.
Step 5.
Here select option Computer account and press Next.
Step 6.
Locate and select Local computer, confirm with Finish.
Step 7.
Now you can close window Add Standalone Snap-in, click on OK in Add/Remove Snap in.
Step 8.
The last step is to return to mmc.
Installation of root certificate (Root CA)
Step 1.
You should click on Trusted Root Ca in Console Root with right button on the mouse, then choose All Tasks and Import.
Step 2.
The Certificate Import Wizard will appear on the screen, it will guide you through all the installation steps. Click Next in the welcome window of the wizard.
Step 3.
Find Root CA certificate using option Browse and confirm with Next button
Step 4.
At the end finish the process by clicking on Finish.
Installation of intermediate certificate (Intermediate CA)
Step 1.
In the Console Root, right-click the mouse on the Intermediate CA and then choose All Tasks and Import.
Step 2.
At this stage wizard appears again. Proceed as in case of the root certificate (above) attaching the intermediate certificate file (eg. your_domain.crt).
Note: If you need to install a number of intermediate certificates, the process of adding to the wizard should be carried out for each of these certificates.
Step 3.
Make sure that in place marked as Trusted Root Certification Authorisies there is root certificate CA and in a place called Intermediate Certification Authorities there should be intermediate certificate (or certificates).
Step 2.
It may be necessary to restart the server to complete the installation of the certificates properly.
Installation of the certificate.
Before starting the installation of the certificate the file must be saved in a text document as your_domain.crt.
Step 1.
In Start menu, select Control Panel. The next step will be to enter administrative tools -> II SM -> Server name.
Step 2.
Then click on Server Certificates icon. This will open a window called Internet Information Services (IIS) Manager.
Step 3.
Now select option Complete Certificate Request. It is located on the right side of the window in the Actions tab.
Step 4.
A new window appears. Select the location where the certificate file twoja_domena.crt is stored and then enter your domain name in the box below. Confirm by clicking OK button.
Note: In some cases the server may generate a message: „Cannot find the certificate request associated with this certificate file. A certificate request must be completed on the computer where it was created” or „ASN1 bad tag value met”.
If your certificate is installed on the same server on which CSR key was previously generated, in most cases, this means that the certificate has already been installed. In such a case close the message and refresh the list of available certificates. If your certificate appears on the list, proceed to the next step. If the certificate does not appear on the list, you must issue the certificate again using new CSR file.
Launching the encryption of the page.
Step 1.
At this stage you should go back to the main catalogue of our site. In the middle part an option called Default Website Home should appear or proper name of the page we established.
Step 2.
In Actions tab select Bindings.
Step 3.
Window called Site Bindings appears. Select options and set respectively:
Type - https
IP address - the IP of page or the value All Unassigned.
Port - 443
SSL certificate - the name of the installed certificate.
As the above values are set, click OK to confirm and save the changes.
Note: If in Type part https option will be selected by default, then select it again to be certain that it will be saved during installation.
Step 4.
The last step involves the approval using OK button in Web Site Bindings window. Restart the server or website. The installation is completed.
 We may use cookies - see details. You can delete or disable these cookies in your web browser if you wish but then our site may not work correctly